Cet article va vous expliquer comment faire un coin-coin, aussi connu comme un papier diseuse de bonne aventure, bavarde, le sel de la cave, ou whirlybird. Ce sont de très bons moyens pour tromper l'ennui, et sont faciles à faire.
les Étapes
1
@@_
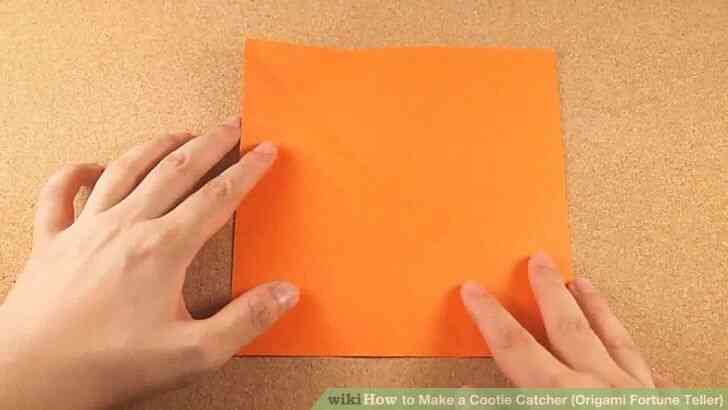
@@Préparer votre papier. Pour faire une diseuse de bonne aventure/coin-coin, vous devez utiliser un morceau de papier qui a la forme d'un carré. Si vous avez une pièce rectangulaire de papier, vous pouvez le plier en carré et couper l'excédent. Pour ce faire, pliez un coin de papier en diagonale jusqu'à ce que les bords de la ligne. Il devrait y avoir une longue pièce rectangulaire de déplié de papier sur le bas, ce qui devrait être supprimé par la coupure ou de déchirure.
http://pad1.whstatic.com/images/thumb/b/b3/Make-a-Cootie-Catcher-(Origami-Fortune-Teller)-Step-1-preview-Version-2.jpg/550px-Make-a-Cootie-Catcher-(Origami-Fortune-Teller)-Step-1-preview-Version-2.jpg
http://pad2.whstatic.com/images/thumb/b/b3/Make-a-Cootie-Catcher-(Origami-Fortune-Teller)-Step-1-preview-Version-2.jpg/300px-Make-a-Cootie-Catcher-(Origami-Fortune-Teller)-Step-1-preview-Version-2.jpg
/8/8e/Faire un coin-coin (Origami diseuse de bonne aventure) Étape 1 Version 2.360 p.mp4
2
@@_
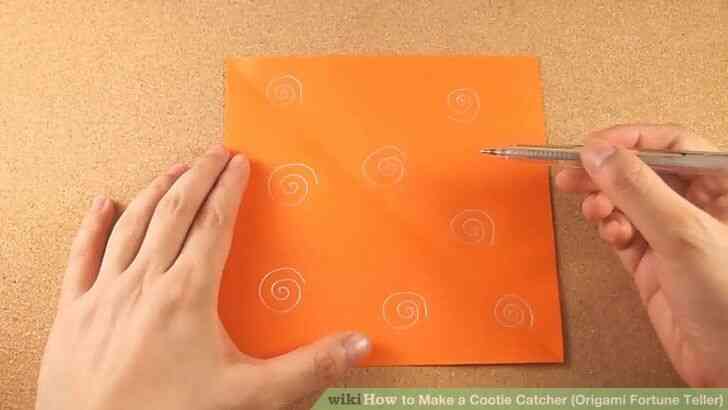
@@Décorer un côté si vous voulez.
http://pad1.whstatic.com/images/thumb/d/df/Make-a-Cootie-Catcher-(Origami-Fortune-Teller)-Step-2-preview-Version-2.jpg/550px-Make-a-Cootie-Catcher-(Origami-Fortune-Teller)-Step-2-preview-Version-2.jpg
http://pad3.whstatic.com/images/thumb/d/df/Make-a-Cootie-Catcher-(Origami-Fortune-Teller)-Step-2-preview-Version-2.jpg/300px-Make-a-Cootie-Catcher-(Origami-Fortune-Teller)-Step-2-preview-Version-2.jpg
/d/dd/Faire un coin-coin (Origami diseuse de bonne aventure) Version de l'Étape 2 2.360 p.mp4
3
@@_
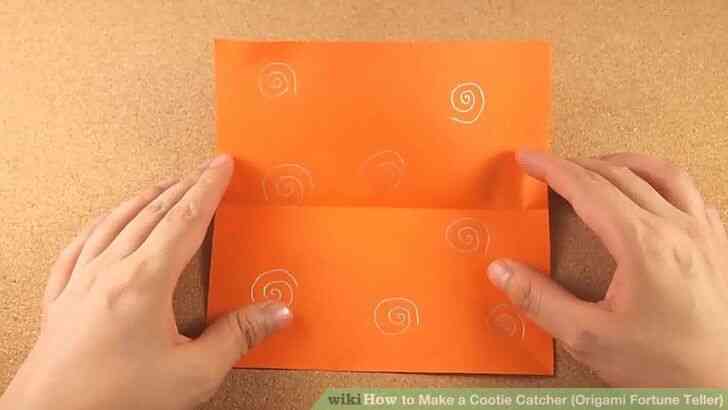
@@Pliez votre papier en longueur. Avec votre document sous la forme d'un carré, pliez-la en deux de sorte que les bords de la ligne et vous êtes de gauche avec une forme rectangulaire. Pli le bord de sorte que le pli est défini et sécurisé. Ensuite, dépliez le papier dans la forme d'un carré.
http://pad1.whstatic.com/images/thumb/1/1d/Make-a-Cootie-Catcher-(Origami-Fortune-Teller)-Step-3-preview-Version-2.jpg/550px-Make-a-Cootie-Catcher-(Origami-Fortune-Teller)-Step-3-preview-Version-2.jpg
http://pad2.whstatic.com/images/thumb/1/1d/Make-a-Cootie-Catcher-(Origami-Fortune-Teller)-Step-3-preview-Version-2.jpg/300px-Make-a-Cootie-Catcher-(Origami-Fortune-Teller)-Step-3-preview-Version-2.jpg
/c/c7/Faire un coin-coin (Origami diseuse de bonne aventure) Étape 3 Version 2.360 p.mp4
4
@@_
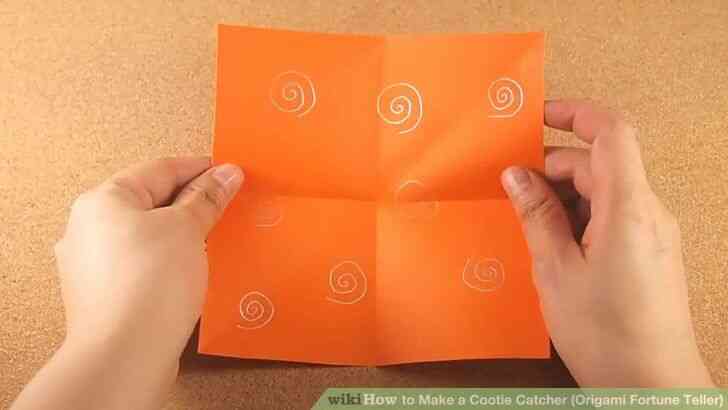
@@Pliez votre papier en largeur. Lorsque votre document a été déplié de retour dans son origine, de forme carrée, le plier en deux à nouveau, mais cette fois dans la direction opposée de la précédente fois. Pli le pli pour le maintenir en place, puis dépliez le carré de nouveau. Le carré doit avoir un grand ' X ' en passant par le centre de maintenant.
http://pad2.whstatic.com/images/thumb/3/3a/Make-a-Cootie-Catcher-(Origami-Fortune-Teller)-Step-4-preview-Version-2.jpg/550px-Make-a-Cootie-Catcher-(Origami-Fortune-Teller)-Step-4-preview-Version-2.jpg
http://pad1.whstatic.com/images/thumb/3/3a/Make-a-Cootie-Catcher-(Origami-Fortune-Teller)-Step-4-preview-Version-2.jpg/300px-Make-a-Cootie-Catcher-(Origami-Fortune-Teller)-Step-4-preview-Version-2.jpg
/6/6c/Faire un coin-coin (Origami diseuse de bonne aventure) Étape 4 Version 2.360 p.mp4
5
@@_
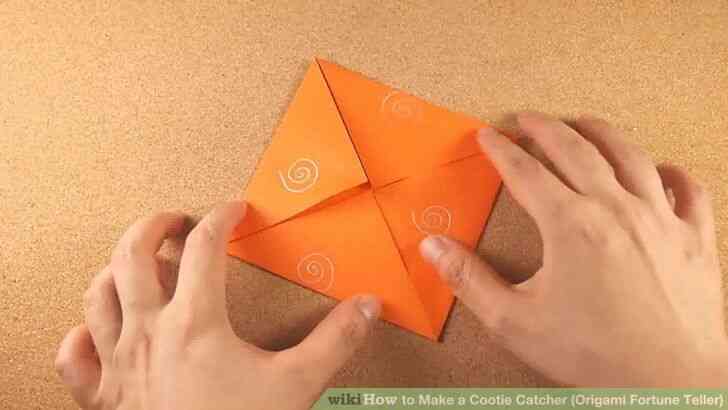
@@Replier les coins vers le centre. Travailler votre chemin autour de la place, pliage de chacun des coins vers le centre. Il faudrait plutôt définis point central comme un résultat de votre précédent pliage, afin de faire correspondre les quatre coins au centre devrait être facile. Vous devez être laissé avec un (plié, évidemment) plus petit carré/losange.
http://pad3.whstatic.com/images/thumb/b/b7/Make-a-Cootie-Catcher-(Origami-Fortune-Teller)-Step-5-preview-Version-2.jpg/550px-Make-a-Cootie-Catcher-(Origami-Fortune-Teller)-Step-5-preview-Version-2.jpg
http://pad2.whstatic.com/images/thumb/b/b7/Make-a-Cootie-Catcher-(Origami-Fortune-Teller)-Step-5-preview-Version-2.jpg/300px-Make-a-Cootie-Catcher-(Origami-Fortune-Teller)-Step-5-preview-Version-2.jpg
/4/44/ Faire un coin-coin (Origami diseuse de bonne aventure) Étape 5 de la Version 2.360 p.mp4

6
@@_
@@Flip le papier, et repliez les coins à nouveau. Retournez votre papier plié de sorte que la déjà plié à angles sont orientés vers le bas, et le plat, lisse face supérieure de la feuille est en face de vous. Répéter ladite étape de pliage de tous les coins vers l'intérieur pour répondre à la centre de. Ce sera une fois de plus vous laisser avec un petit carré en forme de diamant.
http://pad3.whstatic.com/images/thumb/d/da/Make-a-Cootie-Catcher-(Origami-Fortune-Teller)-Step-6-preview-Version-2.jpg/550px-Make-a-Cootie-Catcher-(Origami-Fortune-Teller)-Step-6-preview-Version-2.jpg
http://pad3.whstatic.com/images/thumb/d/da/Make-a-Cootie-Catcher-(Origami-Fortune-Teller)-Step-6-preview-Version-2.jpg/300px-Make-a-Cootie-Catcher-(Origami-Fortune-Teller)-Step-6-preview-Version-2.jpg
/2/2f/Faire un coin-coin (Origami diseuse de bonne aventure) Étape 6 de la Version 2.360 p.mp4
7
@@_
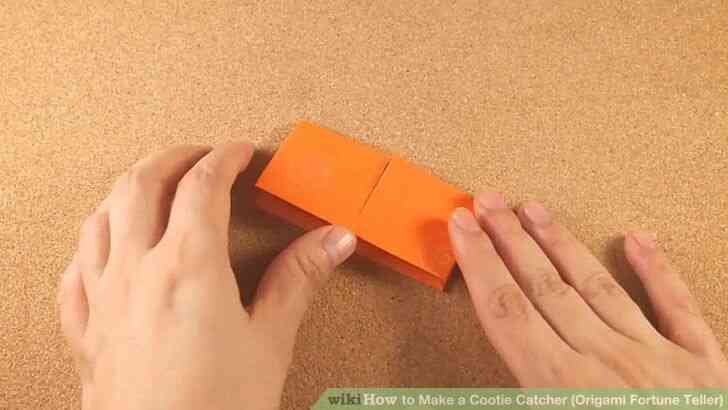
@@Pliez le papier en deux fois dans chaque direction. Votre coin-coin est dans les dernières étapes de pliage! Avant de terminer la forme principale, réaffirmer les plis en pliant le papier en deux dans les deux directions. Cela rendra le coin-coin plus facile à ouvrir.
http://pad1.whstatic.com/images/thumb/a/ab/Make-a-Cootie-Catcher-(Origami-Fortune-Teller)-Step-7-preview-Version-2.jpg/550px-Make-a-Cootie-Catcher-(Origami-Fortune-Teller)-Step-7-preview-Version-2.jpg
http://pad1.whstatic.com/images/thumb/a/ab/Make-a-Cootie-Catcher-(Origami-Fortune-Teller)-Step-7-preview-Version-2.jpg/300px-Make-a-Cootie-Catcher-(Origami-Fortune-Teller)-Step-7-preview-Version-2.jpg
/5/51/ Faire un coin-coin (Origami diseuse de bonne aventure) Step 7 Version 2.360 p.mp4
8
@@_
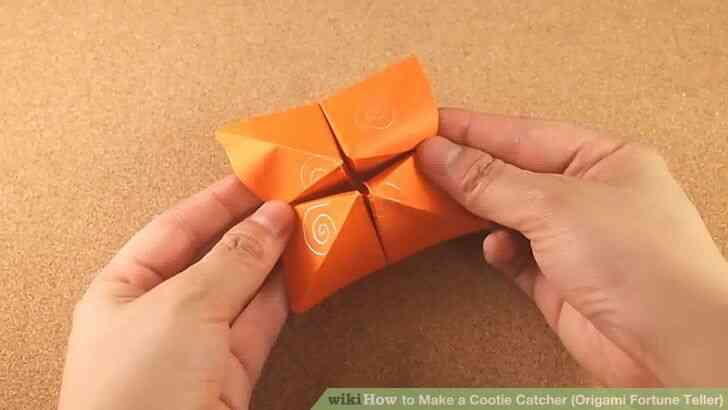
@@Tirez les languettes vers vous. Retournez le papier de retour sur, et il devrait y avoir quatre petits carrés qui sont formés et sont ouverts dans les coins. Tirez ces vers l'extérieur, et le centre doit plier vers l'intérieur un peu. Insérez vos doigts dans les espaces vides, et vous devriez être terminé![1]@@_
@@
http://pad2.whstatic.com/images/thumb/a/a6/Make-a-Cootie-Catcher-(Origami-Fortune-Teller)-Step-8-preview-Version-2.jpg/550px-Make-a-Cootie-Catcher-(Origami-Fortune-Teller)-Step-8-preview-Version-2.jpg
http://pad2.whstatic.com/images/thumb/a/a6/Make-a-Cootie-Catcher-(Origami-Fortune-Teller)-Step-8-preview-Version-2.jpg/300px-Make-a-Cootie-Catcher-(Origami-Fortune-Teller)-Step-8-preview-Version-2.jpg
/c/c2/Faire un coin-coin (Origami Fortune Teller) l'Étape 8 de la Version 2.360 p.mp4
9
@@_
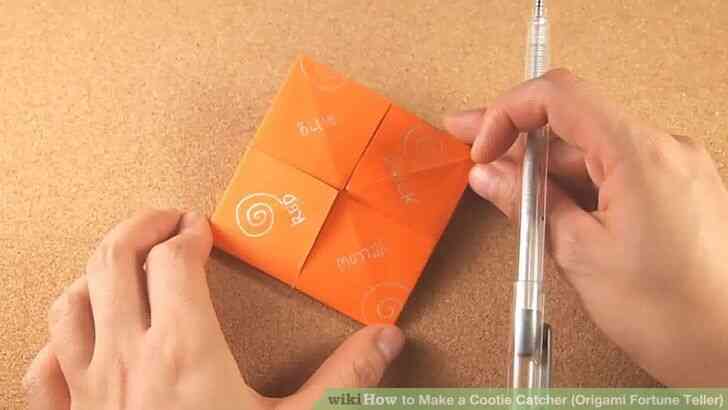
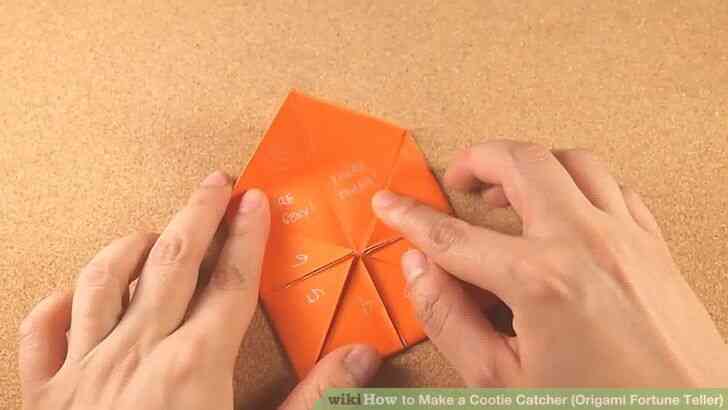
@@Ajouter votre sort et de l'information pour le coin-coin. Typiquement, il y a trois sections principales de la coin-coin qui doivent être étiquetés. Lorsque vous tenez la catcher, chacun des quatre coin onglets doivent être marqués avec une couleur. Lorsque vous aplatissez la catcher, l'intérieur onglets doivent être marqués à l'extérieur avec un nombre. Enfin, chacune des languettes intérieures doivent être étiquetés avec une fortune/note (en vertu d'un numéro correspondant) à lire lorsque l'ouvert.[2]@@_
@@
http://pad2.whstatic.com/images/thumb/0/00/Make-a-Cootie-Catcher-(Origami-Fortune-Teller)-Step-9-preview-Version-2.jpg/550px-Make-a-Cootie-Catcher-(Origami-Fortune-Teller)-Step-9-preview-Version-2.jpg
http://pad2.whstatic.com/images/thumb/0/00/Make-a-Cootie-Catcher-(Origami-Fortune-Teller)-Step-9-preview-Version-2.jpg/300px-Make-a-Cootie-Catcher-(Origami-Fortune-Teller)-Step-9-preview-Version-2.jpg
/b/b2/Faire un coin-coin (Origami diseuse de bonne aventure) Étape 9 Version 2.360 p.mp4
10
@@_
@@Terminé.
http://pad1.whstatic.com/images/thumb/4/42/Make-a-Cootie-Catcher-(Origami-Fortune-Teller)-Step-10-preview-Version-2.jpg/550px-Make-a-Cootie-Catcher-(Origami-Fortune-Teller)-Step-10-preview-Version-2.jpg
http://pad3.whstatic.com/images/thumb/4/42/Make-a-Cootie-Catcher-(Origami-Fortune-Teller)-Step-10-preview-Version-2.jpg/300px-Make-a-Cootie-Catcher-(Origami-Fortune-Teller)-Step-10-preview-Version-2.jpg
/4/41/ Faire un coin-coin (Origami diseuse de bonne aventure) Étape 10 Version 2.360 p.mp4
Comment Faire un coin-coin (Origami diseuse de bonne aventure)
Cet article va vous expliquer comment faire un coin-coin, aussi connu comme un papier diseuse de bonne aventure, bavarde, le sel de la cave, ou whirlybird. Ce sont de tres bons moyens pour tromper l'ennui, et sont faciles a faire.
les Etapes
1
@@_
@@Preparer votre papier. Pour faire une diseuse de bonne aventure/coin-coin, vous devez utiliser un morceau de papier qui a la forme d'un carre. Si vous avez une piece rectangulaire de papier, vous pouvez le plier en carre et couper l'excedent. Pour ce faire, pliez un coin de papier en diagonale jusqu'a ce que les bords de la ligne. Il devrait y avoir une longue piece rectangulaire de deplie de papier sur le bas, ce qui devrait etre supprime par la coupure ou de dechirure.
http://pad1.whstatic.com/images/thumb/b/b3/Make-a-Cootie-Catcher-(Origami-Fortune-Teller)-Step-1-preview-Version-2.jpg/550px-Make-a-Cootie-Catcher-(Origami-Fortune-Teller)-Step-1-preview-Version-2.jpg
http://pad2.whstatic.com/images/thumb/b/b3/Make-a-Cootie-Catcher-(Origami-Fortune-Teller)-Step-1-preview-Version-2.jpg/300px-Make-a-Cootie-Catcher-(Origami-Fortune-Teller)-Step-1-preview-Version-2.jpg
/8/8e/Faire un coin-coin (Origami diseuse de bonne aventure) Etape 1 Version 2.360 p.mp4
2
@@_
@@Decorer un cote si vous voulez.
http://pad1.whstatic.com/images/thumb/d/df/Make-a-Cootie-Catcher-(Origami-Fortune-Teller)-Step-2-preview-Version-2.jpg/550px-Make-a-Cootie-Catcher-(Origami-Fortune-Teller)-Step-2-preview-Version-2.jpg
http://pad3.whstatic.com/images/thumb/d/df/Make-a-Cootie-Catcher-(Origami-Fortune-Teller)-Step-2-preview-Version-2.jpg/300px-Make-a-Cootie-Catcher-(Origami-Fortune-Teller)-Step-2-preview-Version-2.jpg
/d/dd/Faire un coin-coin (Origami diseuse de bonne aventure) Version de l'Etape 2 2.360 p.mp4
3
@@_
@@Pliez votre papier en longueur. Avec votre document sous la forme d'un carre, pliez-la en deux de sorte que les bords de la ligne et vous etes de gauche avec une forme rectangulaire. Pli le bord de sorte que le pli est defini et securise. Ensuite, depliez le papier dans la forme d'un carre.
http://pad1.whstatic.com/images/thumb/1/1d/Make-a-Cootie-Catcher-(Origami-Fortune-Teller)-Step-3-preview-Version-2.jpg/550px-Make-a-Cootie-Catcher-(Origami-Fortune-Teller)-Step-3-preview-Version-2.jpg
http://pad2.whstatic.com/images/thumb/1/1d/Make-a-Cootie-Catcher-(Origami-Fortune-Teller)-Step-3-preview-Version-2.jpg/300px-Make-a-Cootie-Catcher-(Origami-Fortune-Teller)-Step-3-preview-Version-2.jpg
/c/c7/Faire un coin-coin (Origami diseuse de bonne aventure) Etape 3 Version 2.360 p.mp4
4
@@_
@@Pliez votre papier en largeur. Lorsque votre document a ete deplie de retour dans son origine, de forme carree, le plier en deux a nouveau, mais cette fois dans la direction opposee de la precedente fois. Pli le pli pour le maintenir en place, puis depliez le carre de nouveau. Le carre doit avoir un grand ' X ' en passant par le centre de maintenant.
http://pad2.whstatic.com/images/thumb/3/3a/Make-a-Cootie-Catcher-(Origami-Fortune-Teller)-Step-4-preview-Version-2.jpg/550px-Make-a-Cootie-Catcher-(Origami-Fortune-Teller)-Step-4-preview-Version-2.jpg
http://pad1.whstatic.com/images/thumb/3/3a/Make-a-Cootie-Catcher-(Origami-Fortune-Teller)-Step-4-preview-Version-2.jpg/300px-Make-a-Cootie-Catcher-(Origami-Fortune-Teller)-Step-4-preview-Version-2.jpg
/6/6c/Faire un coin-coin (Origami diseuse de bonne aventure) Etape 4 Version 2.360 p.mp4
5
@@_
@@Replier les coins vers le centre. Travailler votre chemin autour de la place, pliage de chacun des coins vers le centre. Il faudrait plutot definis point central comme un resultat de votre precedent pliage, afin de faire correspondre les quatre coins au centre devrait etre facile. Vous devez etre laisse avec un (plie, evidemment) plus petit carre/losange.
http://pad3.whstatic.com/images/thumb/b/b7/Make-a-Cootie-Catcher-(Origami-Fortune-Teller)-Step-5-preview-Version-2.jpg/550px-Make-a-Cootie-Catcher-(Origami-Fortune-Teller)-Step-5-preview-Version-2.jpg
http://pad2.whstatic.com/images/thumb/b/b7/Make-a-Cootie-Catcher-(Origami-Fortune-Teller)-Step-5-preview-Version-2.jpg/300px-Make-a-Cootie-Catcher-(Origami-Fortune-Teller)-Step-5-preview-Version-2.jpg
/4/44/ Faire un coin-coin (Origami diseuse de bonne aventure) Etape 5 de la Version 2.360 p.mp4
6
@@_
@@Flip le papier, et repliez les coins a nouveau. Retournez votre papier plie de sorte que la deja plie a angles sont orientes vers le bas, et le plat, lisse face superieure de la feuille est en face de vous. Repeter ladite etape de pliage de tous les coins vers l'interieur pour repondre a la centre de. Ce sera une fois de plus vous laisser avec un petit carre en forme de diamant.
http://pad3.whstatic.com/images/thumb/d/da/Make-a-Cootie-Catcher-(Origami-Fortune-Teller)-Step-6-preview-Version-2.jpg/550px-Make-a-Cootie-Catcher-(Origami-Fortune-Teller)-Step-6-preview-Version-2.jpg
http://pad3.whstatic.com/images/thumb/d/da/Make-a-Cootie-Catcher-(Origami-Fortune-Teller)-Step-6-preview-Version-2.jpg/300px-Make-a-Cootie-Catcher-(Origami-Fortune-Teller)-Step-6-preview-Version-2.jpg
/2/2f/Faire un coin-coin (Origami diseuse de bonne aventure) Etape 6 de la Version 2.360 p.mp4
7
@@_
@@Pliez le papier en deux fois dans chaque direction. Votre coin-coin est dans les dernieres etapes de pliage! Avant de terminer la forme principale, reaffirmer les plis en pliant le papier en deux dans les deux directions. Cela rendra le coin-coin plus facile a ouvrir.
http://pad1.whstatic.com/images/thumb/a/ab/Make-a-Cootie-Catcher-(Origami-Fortune-Teller)-Step-7-preview-Version-2.jpg/550px-Make-a-Cootie-Catcher-(Origami-Fortune-Teller)-Step-7-preview-Version-2.jpg
http://pad1.whstatic.com/images/thumb/a/ab/Make-a-Cootie-Catcher-(Origami-Fortune-Teller)-Step-7-preview-Version-2.jpg/300px-Make-a-Cootie-Catcher-(Origami-Fortune-Teller)-Step-7-preview-Version-2.jpg
/5/51/ Faire un coin-coin (Origami diseuse de bonne aventure) Step 7 Version 2.360 p.mp4
8
@@_
@@Tirez les languettes vers vous. Retournez le papier de retour sur, et il devrait y avoir quatre petits carres qui sont formes et sont ouverts dans les coins. Tirez ces vers l'exterieur, et le centre doit plier vers l'interieur un peu. Inserez vos doigts dans les espaces vides, et vous devriez etre termine![1]@@_
@@
http://pad2.whstatic.com/images/thumb/a/a6/Make-a-Cootie-Catcher-(Origami-Fortune-Teller)-Step-8-preview-Version-2.jpg/550px-Make-a-Cootie-Catcher-(Origami-Fortune-Teller)-Step-8-preview-Version-2.jpg
http://pad2.whstatic.com/images/thumb/a/a6/Make-a-Cootie-Catcher-(Origami-Fortune-Teller)-Step-8-preview-Version-2.jpg/300px-Make-a-Cootie-Catcher-(Origami-Fortune-Teller)-Step-8-preview-Version-2.jpg
/c/c2/Faire un coin-coin (Origami Fortune Teller) l'Etape 8 de la Version 2.360 p.mp4
9
@@_
@@Ajouter votre sort et de l'information pour le coin-coin. Typiquement, il y a trois sections principales de la coin-coin qui doivent etre etiquetes. Lorsque vous tenez la catcher, chacun des quatre coin onglets doivent etre marques avec une couleur. Lorsque vous aplatissez la catcher, l'interieur onglets doivent etre marques a l'exterieur avec un nombre. Enfin, chacune des languettes interieures doivent etre etiquetes avec une fortune/note (en vertu d'un numero correspondant) a lire lorsque l'ouvert.[2]@@_
@@
http://pad2.whstatic.com/images/thumb/0/00/Make-a-Cootie-Catcher-(Origami-Fortune-Teller)-Step-9-preview-Version-2.jpg/550px-Make-a-Cootie-Catcher-(Origami-Fortune-Teller)-Step-9-preview-Version-2.jpg
http://pad2.whstatic.com/images/thumb/0/00/Make-a-Cootie-Catcher-(Origami-Fortune-Teller)-Step-9-preview-Version-2.jpg/300px-Make-a-Cootie-Catcher-(Origami-Fortune-Teller)-Step-9-preview-Version-2.jpg
/b/b2/Faire un coin-coin (Origami diseuse de bonne aventure) Etape 9 Version 2.360 p.mp4
10
@@_
@@Termine.
http://pad1.whstatic.com/images/thumb/4/42/Make-a-Cootie-Catcher-(Origami-Fortune-Teller)-Step-10-preview-Version-2.jpg/550px-Make-a-Cootie-Catcher-(Origami-Fortune-Teller)-Step-10-preview-Version-2.jpg
http://pad3.whstatic.com/images/thumb/4/42/Make-a-Cootie-Catcher-(Origami-Fortune-Teller)-Step-10-preview-Version-2.jpg/300px-Make-a-Cootie-Catcher-(Origami-Fortune-Teller)-Step-10-preview-Version-2.jpg
/4/41/ Faire un coin-coin (Origami diseuse de bonne aventure) Etape 10 Version 2.360 p.mp4
Comment Faire un coin-coin (Origami diseuse de bonne aventure)
By commentfaire
Cet article va vous expliquer comment faire un coin-coin, aussi connu comme un papier diseuse de bonne aventure, bavarde, le sel de la cave, ou whirlybird. Ce sont de très bons moyens pour tromper l'ennui, et sont faciles à faire.
